5 Ways to Edit Video Faster - Adobe Premiere Pro Workflow Hacks
- Xavier

- May 25, 2020
- 3 min read
Updated: Oct 12, 2020
Editing takes ages. That's a fact.
It's one of the first things I warn my clients when I'm teaching them how to make videos. And it can be slightly disheartening to learn how long it actually takes to edit something together.
Over the last 7 years I've fine-tuned my Adobe Premiere Pro workflow to significantly speed up my editing process. I'm a sucker for productivity life-hacks and I've noticed my clients love learning about my Premiere Pro cheats. So, I present to you my 5 Adobe Premiere Pro "hacks" for faster editing.
1. Trimming Keyboard Shortcuts
My favourite hack! Changing the default keyboard shortcuts for this process is the best thing I've done to speed up my editing.
When editing a video, you will first go through your footage and trim out the sections you want before adding them to your timeline. I call this finding your best 'snippets'. Currently, the default keyboard shortcuts for this process are:
I = In point
O = Out point , (comma) = Insert into timeline.
This makes zero sense for your hand movement on your keyboard, especially if your right hand is on the mouse/touchpad and your left hand needs to reach over to hit the shortcuts. Therefore, I recommend you change your keyboard shortcuts to:
1 = In point
2 = Out point
3 = Insert
You'll overwrite some lesser used shortcuts, but this setup allows your right hand to stay on the mouse/touchpad whilst your left hand goes 1, 2, 3... 1, 2, 3... etc. It's seriously quick!
Here's a two minute video of how to change your keyboard shortcuts.
2. Cleaning up your workspace
Have you noticed there's a bunch of windows in Premiere Pro that you never use? Let's get rid of them.

Click on the hamburger menu of a tab to close it. Personally I've closed every panel in my bottom-left window so that I can just see Project and Effects. No more scrolling through tabs to get where you need to be!
BEFORE

AFTER

Once you've finished personalising your workspace, you can save it as your own.
Go to Window -> Workspaces -> Save as New Workspace
3. Searching for the right music track
I like this hack. You know the process of finding the exact piece of music to fit your video? It's a crucial step but sometimes the journey can kill you. To speed things up I have this little cheat.
Instead of finding your track then downloading the track, importing it into Premiere and adding it into your timeline (only to find out it doesn't work), simply play the track on whichever platform you're listening to then switch programs back to Premiere. You can watch your timeline whilst the music plays in the background. You'll quickly get a sense of the vibe and can navigate through music much quicker!
4. Favourite effects folder
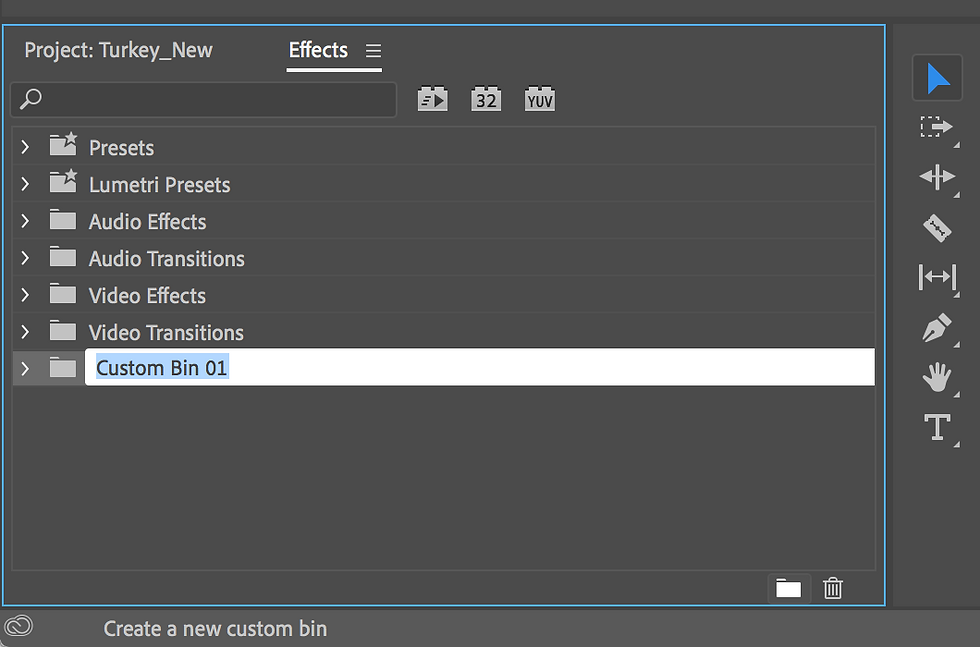
Stop the endless searching for effects and create a favourites folder in your Effects window. Simply press the New Custom Bin icon and give the folder a name. Drag and drop your most used effects into this new bin.


5. Saving your own colour presets
It's likely you'll use the same colouring that you've applied to one video to future videos. The great news is that once you've applied and adjusted a Lumetri Colour effect, you can save these exact same colour settings as your very own 'preset'. This preset can then be added to your favourites folder for future use.
Here's a 50 second video that shows you exactly how to do this.
Here's to life-hacks! I hope you find these little tips and tricks useful in your editing endeavours. I delve much deeper into using Adobe Premiere Pro in my 1-day video editing classes which are held in Brisbane or online via Zoom. You can find out more here: https://www.infocusworkshops.com/
All the best with your editing!


I appreciate the effort put into this article. However, the discussion on interactive digital services feels incomplete without addressing their limitations. Additional background on this topic may be found on the website . A more critical approach would add depth to the analysis.